Don't
forget you can CLICK on a photo to view a larger image.
Go to January 2008
December 2008
- Progress with the cap. return
to Latest News
|
|
|
|
.
(15th December 2008)")
|
|
|
|
The machined tail bearings for the windshaft fitted into the original cast iron housing (from South Ockendon).
(15th December 2008) |
|
|
|
|
|
|
|
|
")
|
|
|
|
Cap framing from above.
(15th December 2008) |
|
|
|
|
|
|
|
|
|
")
|
|
|
|
Cap framing with yours truly for scale.
(15th December 2008) |
|
|
|
|
|
|
|
|
")
|
|
|
|
View through the rear dormer towards the windshaft aperture.
(15th December 2008) |
|
|
|
|
|
|
|
|
|
")
|
|
|
|
View through the windshaft aperture towards the rear showing the complexity of the oak framing.
(15th December 2008) |
|
|
|
|
|
|
|
|
")
|
|
|
|
Shaping one of the oak hangers for mounting one end of the worm gear.
(15th December 2008) |
|
|
|
|
|
|
|
|
|
")
|
|
|
|
As long as it's dry I can carry on working outside even in the dark!
(20th December 2008) |
|
|
|
|
|
|
|
|
")
|
|
|
|
Aluminium 'soakers' are fitted under each corner joint.
(21st December 2008) |
|
|
|
|
|
|
|
|
|
")
|
|
|
|
Detail of the corner mitre joints on the weatherboarding.
(21st December 2008) |
|
|
|
|
|
|
|
|
")
|
|
|
|
Much thought has gone into the aluminium flashing design, which due to the angles is very complicated.
(21st December 2008) |
|
|
|
|
|
|
|
|
|
")
|
|
|
|
No need for a helping hand - my weatherboard 'mate' in action!
(22nd December 2008) |
|
|
|
|
|
|
|
|
")
|
|
|
|
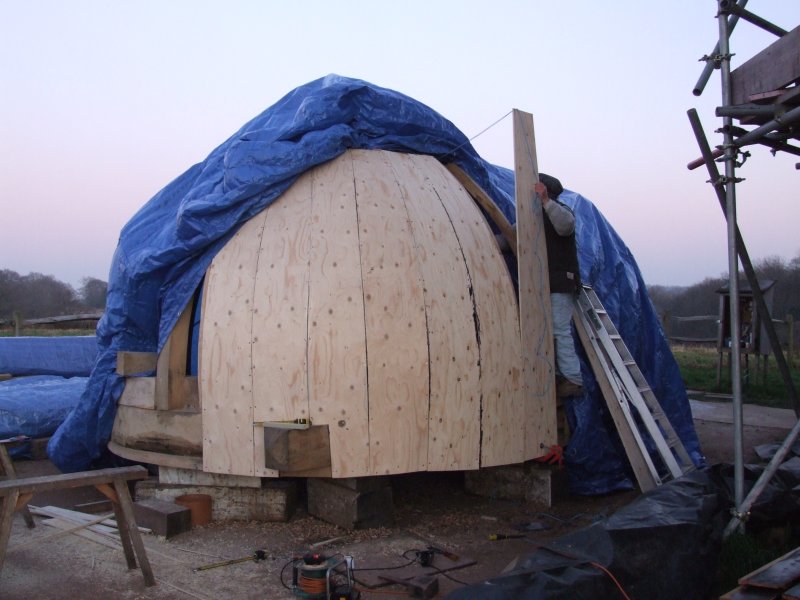
Starting the plywood covering on the cap.
(29th December 2008) |
|
|
|
|
|
|
|
|
|
")
|
|
|
|
Each plywood segment is first fixed at the bottom and then gently bend into place with the aid of a strap.
(29th December 2008) |
|
|
|
|
|
|
|
|
")
|
|
|
|
Inside of the boarded cap frame; the blue hue is the tarpaulin.
(31st December 2008) |
|
|
|
|
|
|
|
|
|
")
|
|
|
|
This picture shows the rather interesting line formed where the plywood of the dome meets the dormer plywood.
(31st December 2008) |
|
|
|
|
|
|
|
|
")
|
|
|
|
Boarding around one of the tower windows.
(31st December 2008) |
|
|
|
|
|
|
|
|
|
|
November 2008
- Starting the cap framing ,and weatherboarding on the tower.
back to top of page
|
|
|
|
")
|
|
|
|
The purlin circle is in position together with the first few ribs.
(1st November 2008) |
|
|
|
|
|
|
|
|
")
|
|
|
|
Here the finial can be clearly seen in position with the first two ribs jointed in.
(1st November 2008)
|
|
|
|
|
|
|
|
|
|
")
|
|
|
|
Raw castings for the windshaft rear bearing. See December for finished assembly.
(7th November 2008) |
|
|
|
|
|
|
|
|
")
|
|
|
|
Seen from above.
(9th November 2008) |
|
|
|
|
|
|
|
|
|
")
|
|
|
|
The cap framing taking shape as viewed from the rear.
(16th November 2008) |
|
|
|
|
|
|
|
|
")
|
|
|
|
The external part of the windshaft is painted in two stages due to the time required between coats.
(16th November 2008) |
|
|
|
|
|
|
|
|
|
")
|
|
|
|
The first part of the weatherboarding on the tower.
(22nd November 2008) |
|
|
|
|
|
|
|
|
")
|
|
|
|
A tilt fillet is first needed to tip the first weatherboard at the correct angle.
(22nd November 2008) |
|
|
|
|
|
|
|
|
go to December 2008
October 2008
- Various tasks are undertaken.
back to top of page
|
|
|
|
")
|
|
|
|
The purlin circle for the cap in the millwrights' workshop.
(10th October 2008) |
|
|
|
|
|
|
|
|
")
|
|
|
|
Tarring of the weatherboarding continues.
(10th October 2008) |
|
|
|
|
|
|
|
|
|
")
|
|
|
|
The windshaft before de-rusting/painting.
(11th October 2008) |
|
|
|
|
|
|
|
|

|
|
|
|
The windshaft neck bearing; the journal of the windshaft is 11.5" in diameter and as can be seen the bearing surface is very small.
|
|
(18th October 2008) |
|
|
|
|
|
|
|
")
|
|
|
|
Battening the tower ready to receive the weatherboarding.
(18th October 2008) |
|
|
|
|
|
|
|
|
")
|
|
|
|
The material for the oak finial centered in the lathe at the workshops of David Archer Furniture Ltd.
(October 2008) |
|
|
|
|
|
|
|
|
|
")
|
|
|
|
Roughing out well under way.
(October 2008) |
|
|
|
|
|
|
|
|
")
|
|
|
|
Turning complete.
(October 2008) |
|
|
|
|
|
|
|
|
|
.
(October 2008)")
|
|
|
|
Machining the facets (to locate the cap ribs).
(October 2008) |
|
|
|
|
|
|
|
|

(October 2008)")
|
|
|
|
David looks pleased with the finished article!
(go on - email me an alternative caption!)
(October 2008) |
|
|
|
|
|
|
|
|
go to November 2008
September 2008
- Construction of the cap starts.
back to top of page
|
|
|
|
")
|
|
|
|
Anthony Hole mortising the cap shears.
(7th September 2008) |
|
|
|
|
|
|
|
|
")
|
|
|
|
The oak weather beam rough sawn from a specially selected curved timber.
(9th September 2008) |
|
|
|
|
|
|
|
|
|
")
|
|
|
|
The plywood is covered with a 'Tyvek' breather membrane. Windy conditions made this fun!
(14th September 2008) |
|
|
|
|
|
|
|
|
")
|
|
|
|
The main cap frame assembled to check the joints.
(18th September 2008) |
|
|
|
|
|
|
|
|
|
")
|
|
|
|
Dave Cullern tarring the first weatherboard; this stirling effort will eventually see Dave complete 1.5 kilometres of boarding!
(21st September 2008) |
|
|
|
|
|
|
|
|
 and the curved weather beam.
(22nd September 2008)")
|
|
|
|
All the cap framing is in oak and this photo shows the cap shears(10" square) and the curved weather beam.
(22nd September 2008) |
|
|
|
|
|
|
|
|
go to October 2008
August 2008
- Tower framing complete.
back to top of page
|
|
|
|
.
(5th August 2008)")
|
|
|
|
A typical joint detail at one of the corner posts (10" square).
(5th August 2008) |
|
|
|
|
|
|
|
|
")
|
|
|
|
Each corner of the wall plate is strenghtened with a steel plate to resist the outward force at the bottom of the corner post.
(5th August 2008) |
|
|
|
|
|
|
|
|
|
")
|
|
|
|
Most of the top floor joists are now in place.
(5th August 2008) |
|
|
|
|
|
|
|
|
")
|
|
|
|
This shows a typical layout for the framing around a window - note also the black tie down straps.
(5th August 2008) |
|
|
|
|
|
|
|
|
|
")
|
|
|
|
One of the two windows just beneath the curb.
(5th August 2008) |
|
|
|
|
|
|
|
|

|
|
|
|
The outside face of the top of the cant posts are curved where they meet the curb as the tower changes from octagonal to round at the top. |
|
(9th August 2008) |
|
|
|
|
|
|
|
")
|
|
|
|
The top windows have short studs to transfer the weight of the curb.
(9th August 2008) |
|
|
|
|
|
|
|
|
")
|
|
|
|
A typical corner joint showing the joint pegs.
(10th August 2008) |
|
|
|
|
|
|
|
|
|
")
|
|
|
|
Sprockets fitted at the base of the tower to tip the weatherboarding out over the brickwork.
(11th August 2008) |
|
|
|
|
|
|
|
|
")
|
|
|
|
Tower framing complete.
(11th August 2008) |
|
|
|
|
|
|
|
|
|
")
|
|
|
|
The outside of the tower is covered with 12mm plywood and screwed at 100mm intervals thus providing a stressed skin to the tower.
(12th August 2008) |
|
|
|
|
|
|
|
|
")
|
|
|
|
The plywood progresses and the door and windows start to appear out of the confusion of framing and scaffolding.
(14th August 2008) |
|
|
|
|
|
|
|
|
|
")
|
|
|
|
Inside the second floor, which is to be our living room.
(16th August 2008) |
|
|
|
|
|
|
|
|
")
|
|
|
|
Detail of the plywood cladding.
(16th August 2008) |
|
|
|
|
|
|
|
|
|
")
|
|
|
|
The window apertures are cut to a template to ease the fitting of the window dormers later on.
(16th August 2008) |
|
|
|
|
|
|
|
|
")
|
|
|
|
View from Leith Hill Tower. Can you spot the windmill?
(24th August 2008) |
|
|
|
|
|
|
|
|
|
")
|
|
|
|
Plywood almost complete.
(24th August 2008) |
|
|
|
|
|
|
|
|
")
|
|
|
|
Lifting the curb rings up to the top of the tower.
(26th August 2008) |
|
|
|
|
|
|
|
|
|
")
|
|
|
|
A straight lift is achieved up the inside of the scaffolding.
(24th August 2008) |
|
|
|
|
|
|
|
|
")
|
|
|
|
One curb ring is in place on the curb and the other is being drilled for the holding down bolts.
(27th August 2008) |
|
|
|
|
|
|
|
|
go to September 2008
July 2008
- Fitting floor joists.
back to top of page
|
|
|
|
")
|
|
|
|
David Archer fitting floor joists in the tower.
(26th July 2008) |
|
|
|
|
|
|
|
|
")
|
|
|
|
Fitting floor joists on the 4th floor.
(26th July 2008) |
|
|
|
|
|
|
|
|
|
")
|
|
|
|
View from the top of Warnham Court clock tower.
(27th July 2008) |
|
|
|
|
|
|
|
|
go to August 2008
June 2008
- Tower erection complete.
back to top of page
Note: For start of tower erection go to
May 2008
|
|
|
|
")
|
|
|
|
Floor beam to cant post joint complete.
(4th June 2008) |
|
|
|
|
|
|
|
|
")
|
|
|
|
The intermediate enter ties were fitted as the main frames were brought together.
(4th June 2008) |
|
|
|
|
|
|
|
|
|
")
|
|
|
|
The intermediate enter ties were all fitted from the cherry picker.
(4th June 2008) |
|
|
|
|
|
|
|
|
")
|
|
|
|
Here you can see the intermediate enter tie tenons just entering the cant post mortices.
(4th June 2008) |
|
|
|
|
|
|
|
|
|
")
|
|
|
|
Lifting the last side assembly.
(4th June 2008) |
|
|
|
|
|
|
|
|
")
|
|
|
|
The last side assembly coming into position.
(4th June 2008) |
|
|
|
|
|
|
|
|
|
")
|
|
|
|
Almost there...........
(4th June 2008) |
|
|
|
|
|
|
|
|
")
|
|
|
|
Fitting the last of the intermediate enter ties.
(4th June 2008) |
|
|
|
|
|
|
|
|
|
")
|
|
|
|
Fitting the first floor beams - these are the largest beams in the mill at 300mm square section.
(4th June 2008) |
|
|
|
|
|
|
|
|
")
|
|
|
|
Lifting the third floor beams.
(4th June 2008) |
|
|
|
|
|
|
|
|
|
")
|
|
|
|
Threading the third floor beams down through the tower was a challenge.
(4th June 2008) |
|
|
|
|
|
|
|
|
")
|
|
|
|
Looking up the middle to the crane jib is an interesting geometrical view.
(4th June 2008) |
|
|
|
|
|
|
|
|
|
")
|
|
|
|
Almost complete.....
(4th June 2008) |
|
|
|
|
|
|
|
|

|
|
|
|
I was lucky enough to be able to go up in the cherry picker for some unique photographs - this one clearly showing the octagonal shape of the mill.
|
|
(4th June 2008) |
|
|
|
|
|
|
|
")
|
|
|
|
Some details of the frame on the way up.
(4th June 2008) |
|
|
|
|
|
|
|
|
")
|
|
|
|
View over the granary showing the field of buttercups.
(4th June 2008) |
|
|
|
|
|
|
|
|
|
")
|
|
|
|
The intermediate enter ties are still to be fitted on this side.
(4th June 2008) |
|
|
|
|
|
|
|
|
")
|
|
|
|
A birdseye view!
(4th June 2008) |
|
|
|
|
|
|
|
|
|
")
|
|
|
|
The view over the village really opened out to the hills beyond.
(4th June 2008) |
|
|
|
|
|
|
|
|

|
|
|
|
My brother Anthony is taking photographs of each stage from the same position. These will be 'animated' into a video at the end of the project.
|
|
(4th June 2008) |
|
|
|
|
|
|
|
")
|
|
|
|
At the end of an exciting day!
(4th June 2008) |
|
|
|
|
|
|
|
|
")
|
|
|
|
Building up the scaffold for the next stage.
(11th June 2008) |
|
|
|
|
|
|
|
|
|
")
|
|
|
|
Wall framing detail on the first floor.
(13th June 2008) |
|
|
|
|
|
|
|
|
")
|
|
|
|
Wall framing accomodating a window aperture.
(13th June 2008) |
|
|
|
|
|
|
|
|
|
")
|
|
|
|
The front door in place.
(14th June 2008) |
|
|
|
|
|
|
|
|
")
|
|
|
|
Lifting the curb up to the top of the tower.
(24th June 2008) |
|
|
|
|
|
|
|
|
|
.
(25th June 2008)")
|
|
|
|
Curb in place (note the mortises are to receive the cogs to form a gear ring around the top of the tower).
(25th June 2008) |
|
|
|
|
|
|
|
|
")
|
|
|
|
Curb from below.
(25th June 2008) |
|
|
|
|
|
|
|
|
go to July 2008
May 2008
-
Framing taking shape, chicken shed demolished, plus start of tower erection.
back to top of page
|
|
|
|
")
|
|
|
|
One of the side frames with part of the curb fitted.
(10th May 2008) |
|
|
|
|
|
|
|
|
")
|
|
|
|
Four frame sections have been made in all - the other four sides will be build up as the frame is erected.
(10th May 2008) |
|
|
|
|
|
|
|
|
|
")
|
|
|
|
The frames are so large that I could only photograph them at this strange angle!
(10th May 2008) |
|
|
|
|
|
|
|
|
")
|
|
|
|
The first floor beams in place and joists fitted.
(10th May 2008) |
|
|
|
|
|
|
|
|
|

|
|
|
|
Pointing complete on the sill with one of the reproduction airbricks fitted that I had designed to be in keeping with the original period.
|
|
(18th May 2008) |
|
|
|
|
|
|
")
|
|
|
|
A temporary floor was made on which the curb has been assembled.
(18th May 2008) |
|
|
|
|
|
|
|
|
|
")
|
|
|
|
The old chicken shed stripped of its weatherboarding as the first stage of demolition.
(18th May 2008) |
|
|
|
|
|
|
|
|
")
|
|
|
|
'Young' Dave Cullern getting to grips with the demolition!
(19th May 2008) |
|
|
|
|
|
|
|
|
|
")
|
|
|
|
Anthony Hole finishing the floor beams in preparation for the lift.
(19th May 2008) |
|
|
|
|
|
|
|
|
")
|
|
|
|
The last of the chicken shed is burnt.
(20th May 2008) |
|
|
|
|
|
|
|
|
|
")
|
|
|
|
The curb assembled on a temporary floor on top of the base.
(21st May 2008) |
|
|
|
|
|
|
|
|
")
|
|
|
|
The first frame assembly is hoisted into place.
(28th May 2008) |
|
|
|
|
|
|
|
|
|
")
|
|
|
|
The first side was held by a guy rope from a winch and the crane unhooked.
(28th May 2008) |
|
|
|
|
|
|
|
|
")
|
|
|
|
The second side is lowered...........
(28th May 2008) |
|
|
|
|
|
|
|
|
|
")
|
|
|
|
Both sides are on guy ropes now as one of the top floor beams is craned into position.
(28th May 2008) |
|
|
|
|
|
|
|
|
")
|
|
|
|
Securing the floor beam from the cherry picker.
(28th May 2008) |
|
|
|
|
|
|
|
|
|
")
|
|
|
|
Here you can see the rather complicated joint at the end of the floor beam.
(28th May 2008) |
|
|
|
|
|
|
|
|
")
|
|
|
|
The second of the top floor beams followed.
Note the curb in the foreground awaiting fitting.
(28th May 2008) |
|
|
|
|
|
|
|
|
|
")
|
|
|
|
Looking up from the ground between the first floor joists.
(28th May 2008) |
|
|
|
|
|
|
|
|
go to June 2008
April 2008 -
News update.
back to top of page
The time has whizzed by again and much has
happened since the last update; indeed we are not
that far away from erecting
the tower frame! For now though I will bring you up to date.
Please go to
16th November 2007
and don't forget that you can click on the
pictures to enlarge them.
|
|
|
|
")
|
|
|
|
In the surprise snow storm - later in the day it had completely vanished!
(6th April 2008) |
|
|
|
|
|
|
|
|
")
|
|
|
|
Nathan from Holemasters drilling the 800mm long vent holes through the wall.
(11th April 2008) |
|
|
|
|
|
|
|
|
|

|
|
|
|
Details of the tie rod design. |
|
(Drawn on AutoCAD LT97) |
|
|
|
|
|
|
")
|
|
|
|
Here you can see how the mill will be tied down to the base of the brickwork.
(18th April 2008) |
|
|
|
|
|
|
|
|
|
")
|
|
|
|
The 'clips' in place for holding the mill down - these will be visible in the living room hence the fancy ends.
(18th April 2008) |
|
|
|
|
|
|
|
|
")
|
|
|
|
The first floorbeams in place. Note the small section of cant post used as a template.
(24th April 2008) |
|
|
|
|
|
|
|
|
|
")
|
|
|
|
Hardcore tamped down ready for concreting; the bricks mark the concrete height.
(24th April 2008) |
|
|
|
|
|
|
|
|
.
(25th April 2008)")
|
|
|
|
John Capstick finishing the concreting (note the cap).
(25th April 2008) |
|
|
|
|
|
|
|
|
|
")
|
|
|
|
The concrete oversite is complete and ready to receive the sleeper walls for the timber floor.
(25th April 2008) |
|
|
|
|
|
|
|
|
go to May 2008
March
2008
-
Base almost finished, treatment plant, and frame progress.
back to top of page
|
|
|
|
")
|
|
|
|
The top of the soakaway - this will eventually be fitted with a hand well pump.
(2nd March 2008) |
|
|
|
|
|
|
|
|
")
|
|
|
|
The scaffolding down at last showing the restored base almost finished.
(2nd March 2008) |
|
|
|
|
|
|
|
|
|
")
|
|
|
|
Setting up the template for the hold down metalwork using a plumbline to find the best fit at the corner.
(2nd March 2008) |
|
|
|
|
|
|
|
|
.
(4th March 2008)")
|
|
|
|
Digging the pit for the water treatment plant (bio tank).
(4th March 2008) |
|
|
|
|
|
|
|
|
|
")
|
|
|
|
Dom of Wimlands Building co at the bottom of the pit - John was tempted to remove the ladder!
(4th March 2008) |
|
|
|
|
|
|
|
|
")
|
|
|
|
John of Wimblands Building Co backfilling the bio tank pit.
(6th March 2008) |
|
|
|
|
|
|
|
|
|
 of cutting with an angle grinder!
(9th March 2008)")
|
|
|
|
At last I had finished raking out the mortar - altogether over a mile (2km) of cutting with an angle grinder!
(9th March 2008) |
|
|
|
|
|
|
|
|
")
|
|
|
|
There is treasure at the end of the rainbow!
(9th March 2008) |
|
|
|
|
|
|
|
|
|
")
|
|
|
|
The upright posts of the frame arriving; there are eight of these and they are called 'cants' in a smock mill.
(11th March 2008) |
|
|
|
|
|
|
|
|
 long.
(11th March 2008)")
|
|
|
|
Here you can appreciate the length of the cants; they are each 34feet (10.4m) long.
(11th March 2008) |
|
|
|
|
|
|
|
|
|
")
|
|
|
|
Each cant had to be craned onto temporary support blocks.
(11th March 2008) |
|
|
|
|
|
|
|
|
")
|
|
|
|
The cants have each been 'boxed' around the centre of the tree to ensure maximum grain strength and resistance to movement.
(11th March 2008) |
|
|
|
|
|
|
|
|
|
")
|
|
|
|
Craning one of the sills onto the scaffolding.
(11th March 2008) |
|
|
|
|
|
|
|
|
")
|
|
|
|
The oak sill in place.
(14th March 2008) |
|
|
|
|
|
|
|
|
|
")
|
|
|
|
A sill corner showing the mortise for the cant post and the sill joint detail.
(14th March 2008) |
|
|
|
|
|
|
|
|
")
|
|
|
|
The first and second frames forming two sides of the octagon.
(30th March 2008) |
|
|
|
|
|
|
|
|
|
")
|
|
|
|
Looking down the length of the first frame showing the tenons at the base, which fit into the sill.
(30th March 2008) |
|
|
|
|
|
|
|
|
go
to April 2008
February 2008
-
Sill restoration and rainwater soakaway.
back to top of page
|
|
|
|
")
|
|
|
|
Bricks cut and positioned ready for Andy the bricklayer to lay.
(8th February 2008) |
|
|
|
|
|
|
|
|
 anf John rebuilding part of the sill - also note replacement bricks waiting to be pointed into the wall above.
(9th February 2008)")
|
|
|
|
Andy (left) anf John rebuilding part of the sill - also note replacement bricks waiting to be pointed into the wall above.
(9th February 2008) |
|
|
|
|
|
|
|
|
|
")
|
|
|
|
Part of the brick sill being prepared for rebuilding.
(16th February 2008) |
|
|
|
|
|
|
|
|
")
|
|
|
|
The rebuilt sill awaiting pointing.
(16th February 2008) |
|
|
|
|
|
|
|
|
|
")
|
|
|
|
John in the digger again this time moving the milton rings for the soakaway.
(23rd February 2008) |
|
|
|
|
|
|
|
|
")
|
|
|
|
The milton rings being lowered - these will form the rainwater soakaway.
(23rd February 2008) |
|
|
|
|
|
|
|
|
go
to March 2008
January 2008 - Base restoration nearing
completion and frame under way.
back to top of page
|
|
|
|
")
|
|
|
|
Cutting out and replacement of the frost eroded bricks is nearing completion.
(12th January 2008) |
|
|
|
|
|
|
|
|
")
|
|
|
|
Dom of Wimlands Building Co pointing with lime mortar.
(12th January 2008) |
|
|
|
|
|
|
|
|
|

|
|
|
|
Detailed drawing of the framework. |
|
(Drawn on AutoCAD LT97) |
|
|
|
|
|
|
")
|
|
|
|
The frame parts being prepared in the workshops of JHE Ltd in Burgess Hill.
(14th January 2008) |
|
|
|
|
|
|
|
|
|
")
|
|
|
|
This shows two of the crossmembers or 'enter ties' being trial fitted.
(14th January 2008) |
|
|
|
|
|
|
|
|
go to February 2008
return to Latest News
.
(15th December 2008)")
")
")
")
")
")
")
")
")
")
")
")
")
")
")
")
")
")
")
")
")
")
")
")
")
")
")

")
")
")
")
.
(October 2008)")

(October 2008)")
")
")
")
")
")
 and the curved weather beam.
(22nd September 2008)")
.
(5th August 2008)")
")
")
")
")

")
")
")
")
")
")
")
")
")
")
")
")
")
")
")
")
")
")
")
")
")
")
")
")
")
")
")
")
")
")

")
")
")
")
")

")
")
")
")
")
")
.
(25th June 2008)")
")
")
")
")
")

")
")
")
")
")
")
")
")
")
")
")
")
")
")
")
")

")
")
")
")
.
(25th April 2008)")
")
")
")
")
.
(4th March 2008)")
")
")
 of cutting with an angle grinder!
(9th March 2008)")
")
")
 long.
(11th March 2008)")
")
")
")
")
")
")
")
")
 anf John rebuilding part of the sill - also note replacement bricks waiting to be pointed into the wall above.
(9th February 2008)")
")
")
")
")
")
")

")
")